Mentoring a Teenager: Decorating our Mailboxes

This summer, I was asked by the kiddo of a friend of mine to be their mentor, “Just be a positive adult role model that I can do things with.” That seemed easy enough, and for the most part, it has been. We spend nearly every Sunday together, and we do all kinds of fun things. We have volunteered for hiking trail cleanups, seen documentaries examining institutionalized racism, gone to farmers markets, clothing swaps, and backpack giveaways for students. In the course of these activities, we’ve talked about everything from TV to teenage angst, which brings with it many real and serious issues. I’ve learned a lot more about the kid I’m mentoring, and a surprising amount about myself, as well.

It occurred to me that it might be a good idea to start sharing some of our Sunday activities, in case you’ve got a teenager, live in Austin, or both.

This weekend, we chose to upgrade our mailboxes, inspired by a post from Lolly Jane. I copied the modern honeycomb-themed project nearly exactly, and the kiddo (with permission from their parents) did their own thing, choosing ombré polka dots, and a glittery yellow mailbox flag. It actually suits their hippie house (complete with VW bus in the driveway) very well!

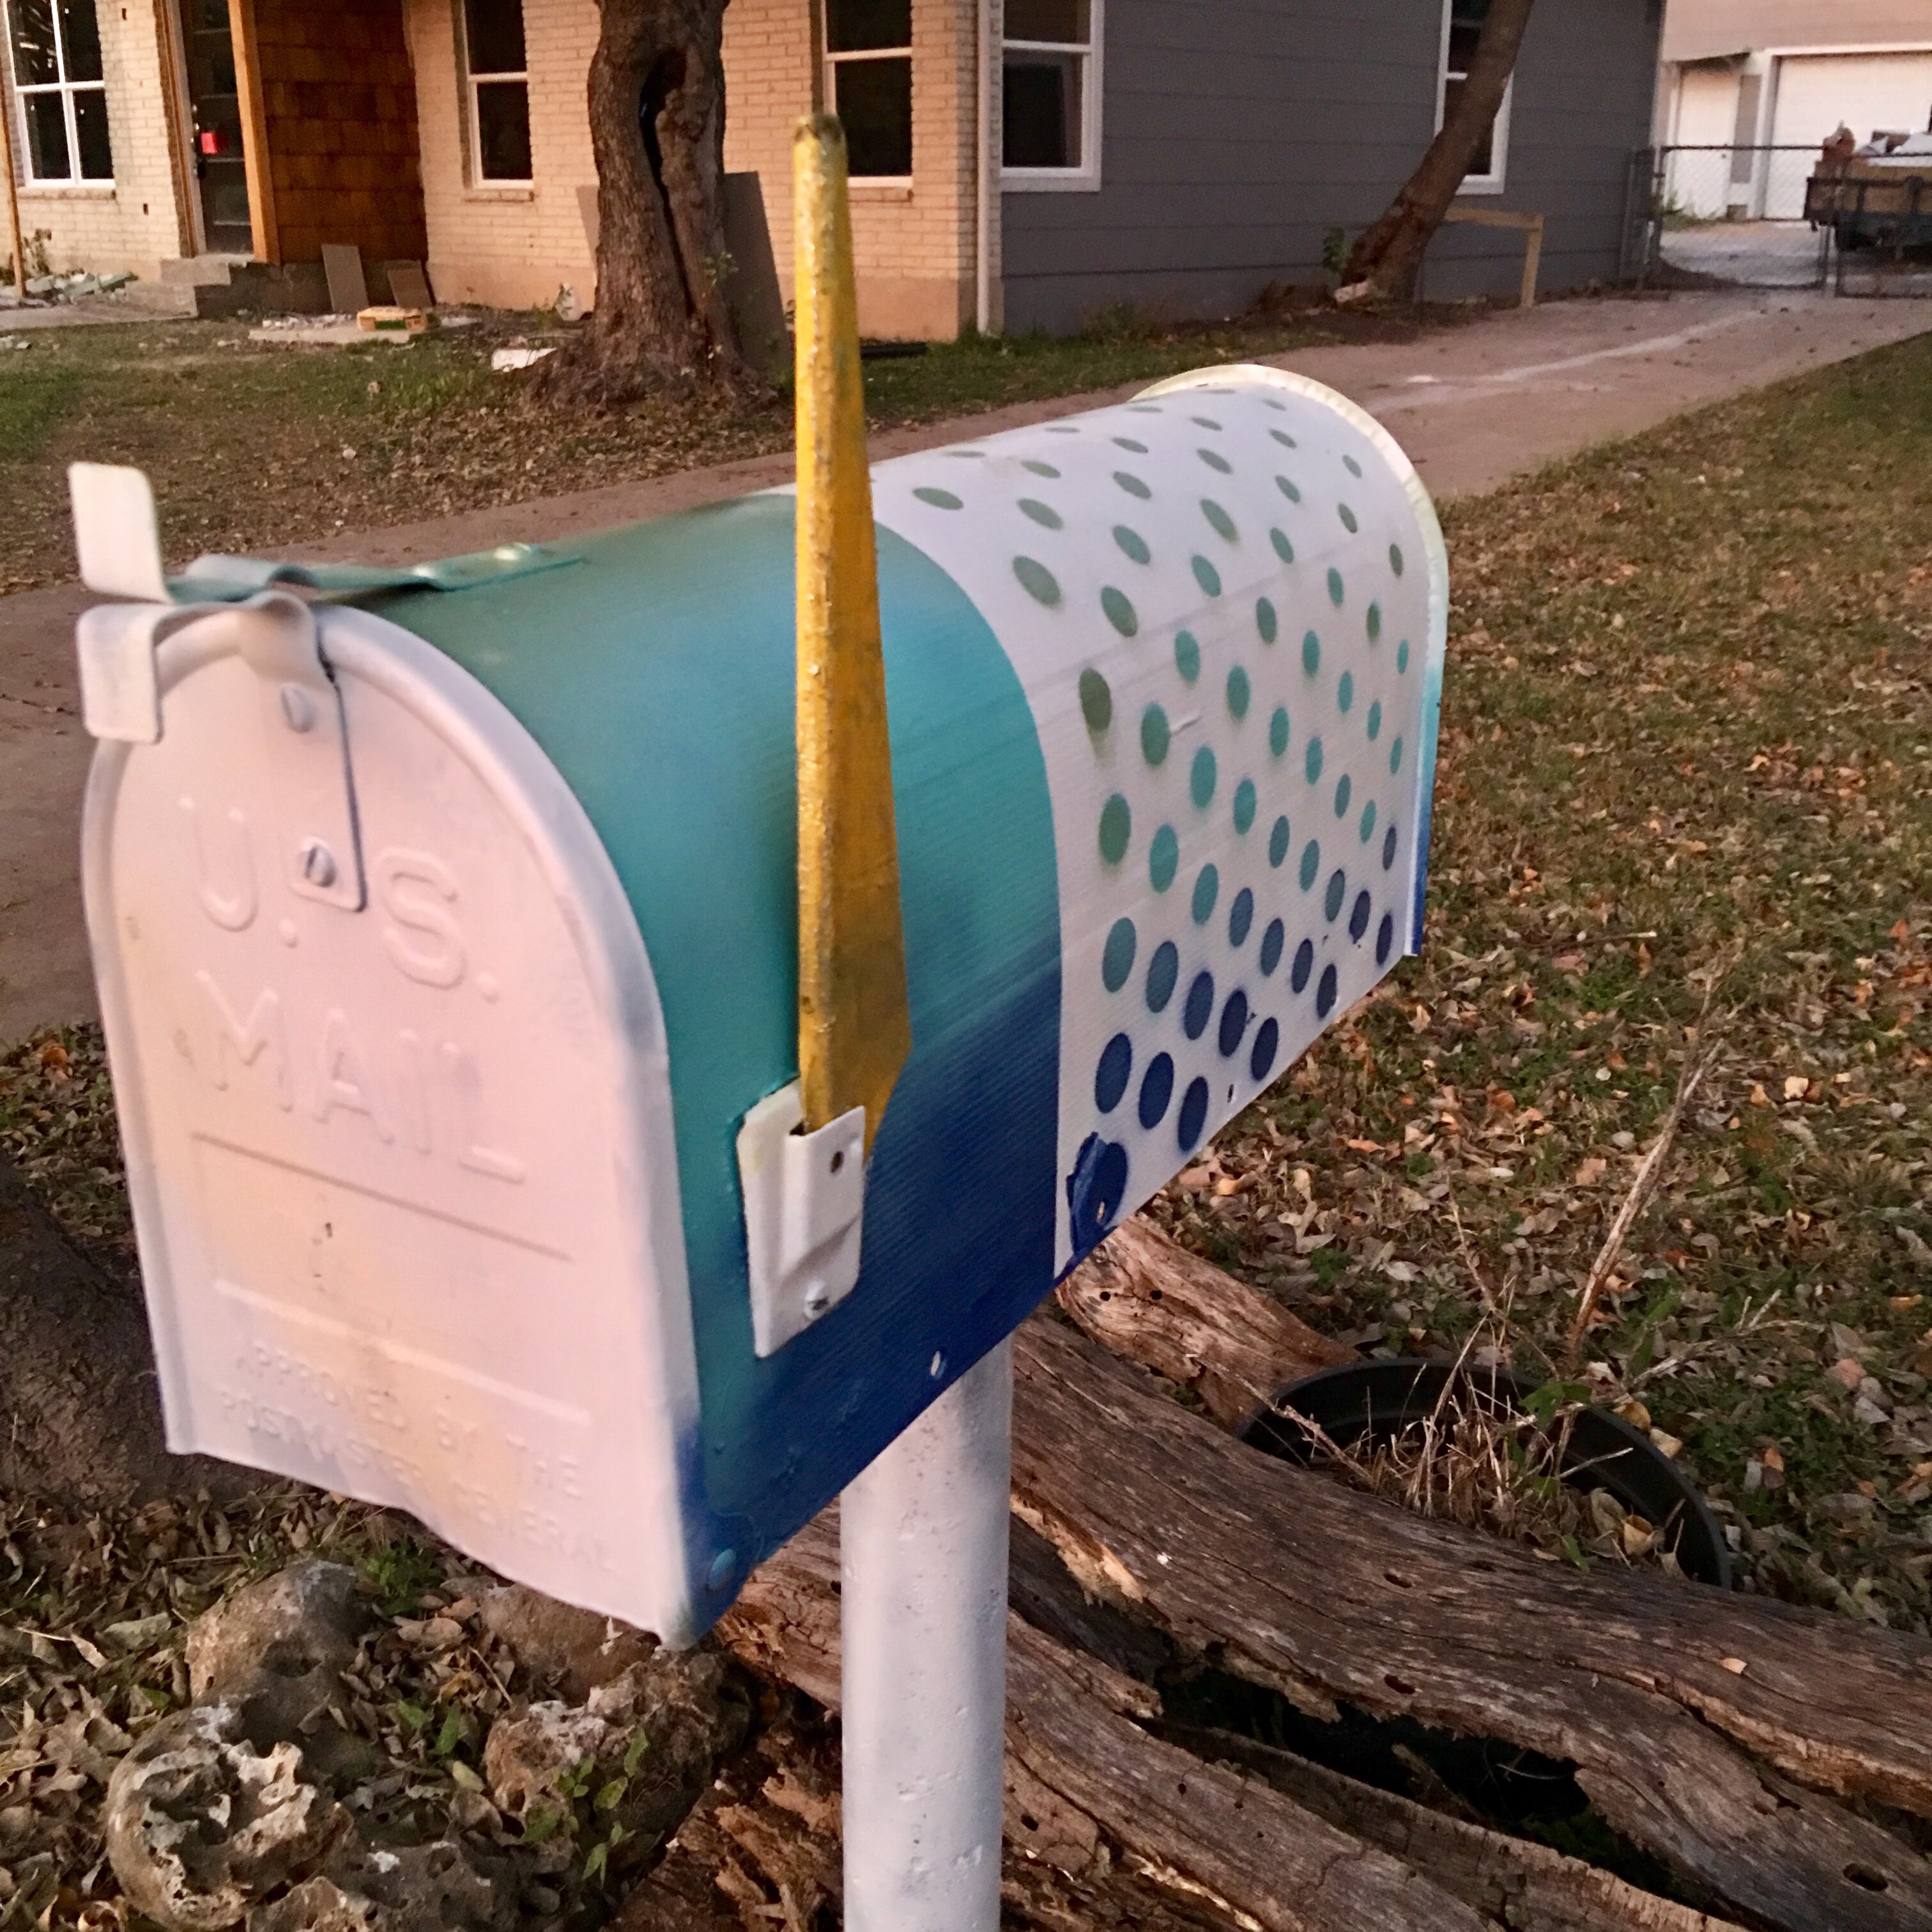
The project actually started last Wednesday, when we stopped into our local craft store looking for hexagon stencils, and also picked up several cans of spray paint. We probably spent $45 and a couple of hours shopping.

Today, we got started in the early afternoon, solving problems of masking and stenciling together, and generally having a good time. We talked about potential careers, and we’re each starting to formulate some goals for 2018. It’s fun to see what we have in common, so that some of our outings can support our mutual goals. We stopped and went for lunch, and the kiddo, who will be turning 15 soon, inquired as to whether the location might hire students with work permits. There’s a big school trip abroad to save for, so I understand why earning might be a priority at present.

Then, back to the mailboxes, which both ended up being perfectly imperfect, in my opinion. Working with stencils is hard! The finishing details came together at sunset, just in time for us to snap a few photos and call the family out to see them. They “oohed” and “ahhed” appropriately, and we all enjoyed the sunset together before I got in my little car and came back home. Today’s part of the project took about 5 hours, including lunch and cleanup time. It flew by, and I don’t think that was bad at all, since we did two mailboxes.

We aren’t sure what we’re doing next week, but seeing as how it’s already December, don’t be surprised if it turns out to be something holiday-related!

Advertisement

Frugal Tuesday: Use the Scraps!

Not long ago, Mr. Vega spent some time screening in our back porch, and it came out beautifully. We used a heavy-duty pet-resistant screening on the bottom, because our cats sometimes get a little excited during their bird- and squirrel-watching time. The upper part of the porch was done with a less-expensive clear-view screening, and there was quite a bit of that left over when the project was completed.

When we bought the school bus that we’re converting into a recreational vehicle, we realized the same thing we already knew about the porch outside our house: the great outdoors is more pleasant without mosquitos in our immediate area!

Fortunately, my husband is pretty creative, and he figured out a way to create some removable window screens that we can mount inside of the open bus windows. Even more fortunately, our leftover screening was just the right amount for what we needed. A trip (okay, three) to the store my Cuban father in law calls “Home People” for framing material, and an afternoon of measuring, sawing, assembling, and splining yielded up  beautiful custom-made screens that will let us enjoy cooling cross-breezes in the bus without any pesky unwanted visitors.

With kitchen, bathroom and flooring projects in store for our little hippie house, we’re looking forward to using more leftover materials for the bus remodel as well.

When have you been able to use supplies left from one project to complete another?

Frugal Tuesday: Fixit Clinics

Last Saturday, a good friend and I walked into Austin’s Recycled Reads bookstore, each with the unlikely goal of getting our pants hemmed. Rather, it would have been an unlikely goal, if the bookstore hadn’t been hosting a FixIt Clinic, where volunteers help members of the community learn to repair their own items. Past clinics have included bicycle and tool repair, and this past weekend’s focus was mending clothing.

My friend and I browsed the used bookstore while we each waited our turn,  enjoyed the in-store performance of four live harpists, and finally got to sit with our volunteers. Mine was a lovely, motherly type who took my garment out of my hands and chatted away for about fifteen minutes while she tackled the repair all by herself, and my friend made herself comfortable on the floor and hemmed her own pants with her volunteer’s guidance and supervision. We had a wonderful time, both with each other and participating in our vibrant, active community, and we each saved the $10 it would have cost to have the repair done at a tailor shop or drycleaner.

Clinics a, organizations and events that assist community members in doing their own repairs are not only frugal, but also eco-friendly: every item that can be repaired or refurbished is one less thing headed to the landfill. And it’s a terrific way to interact with your community and meet more like-minded people.  A quick online search led me to a Fixit Clinic Facebook page, which connects to clinics in many US cities, and similar programs such as the Fix-It Fair in Portland, Oregon, Bicycle Kitchen in Los Angeles,  and U-Fix-It Clinic in Boulder, CO.

If there isn’t a clinic in your community, you can always start one. Many such events are held at public libraries, and you don’t have to know how to fix things to be able to search out volunteers who do, and organize an event.

What do you have that needs fixing? What do you know how to fix that you could help others with?


That Time We Bought a Bus

We’re not sure when the idea formed… Some friends of ours bought a 15-passenger for less than $3, 000 van at the Texas State Surplus store, and we were pretty taken with the idea of getting a well-running vehicle for such a good price. Another friend bought a used Airstream, fixed it up, and made it her primary residence on a piece of rental property just outside a state park. We’ve watched a lot of Tiny House Nation. However it happened, we got the idea of buying a school bus and converting it into an RV/ guest house.

And then we got on eBay.

And a couple of weeks later, we had flown to Indianapolis, where Ron Garrett at MacAllister Transportation facilitated our descent into total bus madness. Seriously, if you are considering buying a bus, this is the guy to see: when Something Unexpected happened, Ron went so far beyond the call of duty to make things right that I’m not going to write about it, because it was done entirely on his own time and on his own dime, and he didn’t have to do any of it. But I can safely say that he’s going to do everything in his power to make sure you drive away happy in your new-to-you bus, like we did.

1300 miles (and two chiropractic appointments later!), our new bus was home, which I’m sure thrilled the neighbors…. Although maybe it’s not an issue, because the people on one side have a little food truck in their driveway, and there’s a reclaimed ambulance on the other side. One friend who visited says our street looked like an Emoji Village! We’re planning on building a driveway/RV pad to park it in the back yard, but record-breaking rains in central Texas over the past several weeks have soaked the ground and postponed our ability to begin that project. In the meantime, the bus is parked in an inexpensive local storage lot, because no matter how cool we think it is, the big yellow bus was a bit of an eyesore in our front driveway! Still, we got such a good deal that we could store it for two years and still come out ahead of what it would have cost to buy it locally!

It’s  been registered, titled, and insured in Texas, and that stuff will all be much less expensive after we’ve converted it into a bona fide RV. Even with no seats, it’s still considered a commercial passenger vehicle until we’ve made some changes. Stay tuned over the next several months, as we gut the inside, paint the outside, and begin the work of transforming our bus into a safe and stylish recreational vehicle!

What’s the biggest DIY project you’ve tackled? 


Spring is Coming…

IMG_0665

The tomato, pepper, and eggplant seedlings we started a few weeks ago are doing well, and the bigger, outside garden is in sight! Our first real attempt at growing in Central Texas was a Fall/Winter garden, and it’s done pretty well. We’ve got plans to build a couple more raised beds and see what the Spring brings us. In a couple of weeks we hope to be sowing carrots, cucumber, kale, beets, bok choy, and summer squash directly into the planters, in addition to transplanting these little guys.

It feels fairly ambitious for us: 50+ square feet of raised beds…. we’re planning to expand well beyond that eventually, but after years of apartment living, we’ve never had that much space to  grow food in! It’s exciting to walk outside and grab kale for a salad, or herbs for a recipe… I’m dreaming of the day I can make a whole meal out of what we’ve grown!

Ironically, we’ve had some difficulty harvesting: I’m working 45+ hours each week, rarely getting home before dark, and Mr. Vega’s full-time school schedule and home-improvement projects keep him hopping. I’m not a fan of Daylight Saving Time, as a modern concept, but I sure am looking forward to it this year! Meanwhile, my husband finally found time to grab the plants that had begun to bolt and make them into a fresh vegetable juice for us…he even juiced the carrot and beet tops, and it’s delicious!

I’m looking forward to longer daylight hours, time spent both in the garden, in the kitchen making some proper meals out of these beautiful plants, and out on the newly screened-in porch my handsome husband has worked so hard to create.

What are you looking forward to this season?


Frugal Tuesday: Watch a Video!

Mr. Vega loves to fix things. He’s a visual person, so frequently he can figure things out just by looking, but when he can’t, he turns to You Tube. Thousands of helpful people have made videos of themselves doing maintenance and repairs, so you can just watch and follow along. You can get instruction on oil changes, cooking, mechanical repairs… even farm chores for beginners!

We’ve saved a lot of money by being willing to try new things. Made-from-scratch food, gardening, remodeling projects and auto repairs. And having access to visual instruction makes it all so much easier… I learned how to open a coconut with almost no effort by watching a video someone had posted of an old island man doing it!

Just this week, one of our pawn shop tool scores stopped working suddenly. When the manufacturer’s repair shop gave us a repair quote of $50-$200 (“We won’t know for sure until we open it up,” Mr. Vega took to the internet and found that the likely culprit was a $20 part. And some kind DIY-er had made a video of himself replacing that exact same part. Feeling confident that he can do it, he ordered the part and saved us $30-$180!

What new-to-you projects have you tried lately, and did you get help from a video?

FrankenSink

This is a post for the true DIY folks… nothing Pinterest-worthy here today! But life in a fixer-upper demands an embrace of the process, and that’s exactly what we’re doing.

This was an unexpected project, so I don’t have a photo of the hideous bathroom cabinet sink that came with our little hippie house, but it was an ancient wood laminate beast with a yellowed fake marble sink (and a burn mark where someone had once laid a cigarette on the edge of its basin).When it developed a drip, Mr. Vega decided that he would rather replace the whole thing than repair the faucet. We had gotten a white pedestal sink that had a crack in it from a neighbor who remodeled, and the $40 porcelain repair kit that we ordered was a total failure. With our House Fund running on fumes, we were starting to get discouraged.

Mr. Vega, being the never-say-die type that he is, stopped in to our local Habitat Re-Store to have a look, where he found a very passable basin for $20. He brought it home, and using the pedestal and faucet handles from the giveaway sink, and the stopper-pull from our previous ugly one, created the one you see above. He kept the actual faucet from the Re-Store basin, as it was the tallest of the three: Hand washing is much more convenient when you can actually fit your hands under the faucet! In the outline left on the wall by paint around the cabinet, you can see we’ve gained a good three inches of the room back, and the pedestal makes the small room feel much less confined than the cabinet did.

Unfortunately, the previous owners had not removed the cabinet sink to install the too-porous-for-a-bathrooom Saltillo tile they had chosen, but rather had gone to the trouble of cutting the tile to lay around the cabinet. Fortunately, they also had not bothered to remove the linoleum that graced the bathroom before the tile, making it much easier to remove than if the job had been done correctly!

So what you see on the floor in the space left by the removal of the cabinet is $9 worth of tile meant to look like rustic hardwood. It’s really kind of cool up close, but it was chosen strictly for its price, as this is a temporary stopover on our way to a full bathroom remodel (some day it will be glorious, with a walk-in steam shower and a skylight). One of the tiles needed to be cut down to fit right, and a kind employee at the Big Box store tool rental department looked the other way for twenty seconds while my resourceful husband made the single cut he needed. He also managed to find, in a scrap pile, just the right amount of baseboard to fill in the gap that was left when the cabinet came out.

Our next project will be to sand down some of the half-century’s worth of paint layers (nearly 1/8″!) made evident by the cabinet’s removal and to paint the whole room with white semi-gloss. I also have a feeling I’m not going to be able to prevent him from replacing the current flooring with ceramic tile, which would be fine by me!

Because of our futile attempt to repair the secondhand sink we had been given, the total cost of our new-to-us sink, including a few bits of hardware, caulk, and the three tile plates, came out to about $80, about half the cost of a brand-new pedestal sink. Mr. Vega got to pick up some new repair skills that will come in handy during the rest of our remodel, and we feel good about salvaging some things that were destined for the landfill (all the usable remaining sink parts will be donated back to the Habitat Re-Store). We’re really happy with the look of the new sink, as it’s much more retro-fabulous than what was in there before, and we think it fits nicely with the updated Atomic Ranch style we’re ultimately going for.

What projects have you undertaken lately in your home? Are you glad you did it, or do you wish you had called in a professional?